Since the beginning, CodeRush has been extensible.
The cardinal rule for extensible architectures:
New revs of the framework can’t break existing plug-ins.
Through each release the IDE Tools team responsible for CodeRush has strived to ensure backward and forward compatibility for 3rd-party plug-ins. And throughout the years, we have by and large achieved this goal.
And along comes the Visual Studio 2010 editor.
Based entirely on WPF.
Which kind of mucks things up for anyone writing plug-ins that paint on the editor. Those plug-ins rely upon DXCore events that pass a GDI Graphics instance which makes it easy to paint on the editor surface. But VS 2010 has effectively removed GDI from the equation.
Which leaves us with a few obvious options:
- Split the code base (attempt to maintain two code bases)
- Abandon GDI and support for GDI-based dev environments (e.g., VS 2008 and earlier)
The cost of splitting the code base is potentially very high, not only for us but also for customers. For us, it makes the code more complex to maintain, and it potentially creates a scenario where CodeRush customers remaining in VS 2008 or VS 2005 might go without issue fixes and enhancements occurring in the latest version of CodeRush working in WPF land. Moving to an entirely new code base has similar consequences for customers remaining in GDI land.
There is also a less obvious solution which is to provide a GDI layer on top of the WPF layer in VS 2010, which would allow editor-surface painting plug-ins written in VS 2008 to continue to work in VS 2010. I’m about as comfortable with this approach/hack as I am squeezing my pet elephant Jorge into my brand new bright yellow Borat-style bathing suit. While such a configuration may appear stylish from a distance and to some degree addresses the forward compatibility challenge, it brings the risk of some serious chafing. It just doesn’t fit in a WPF world where you want to be able to take advantage of everything that Microsoft has added to VS 2010 that works with WPF.
And so we’ve walked away from this more obscure option too.
So we continued to consider the problem.
Around this time I was working on a blog post on Implementing Code Providers, and this bit of code that shows up in the post was on my mind:
private void cpImplementUnimplementedProperty_PreparePreview(object sender, PrepareContentPreviewEventArgs ea)
{
Property oldProperty = GetProperty(ea.Element);
if (oldProperty == null)
return;
ElementBuilder elementBuilder = ea.NewElementBuilder();
string newCode = GetNewPropertyDeclaration(elementBuilder, oldProperty);
ea.AddCodePreview(oldProperty.Range.Start, newCode.Trim());
ea.AddStrikethrough(oldProperty.Range);
}
Notice the last two lines of code. These two lines of code add a visual strikethrough markup over the old code in the editor, and they also add a Code Preview window that’s attached to the code. Both of these look like this:
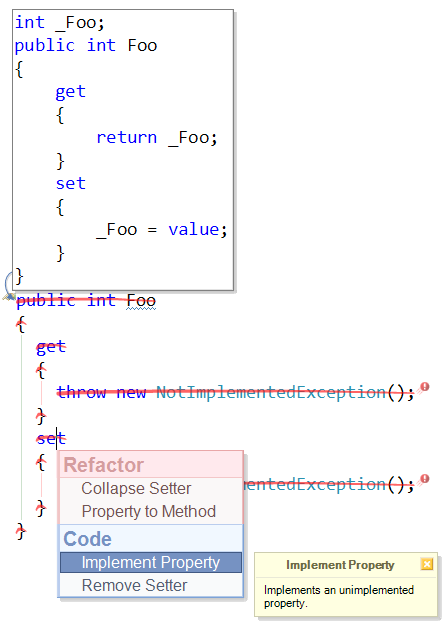
Notice the complete lack of anything even remotely resembling GDI whatsoever in those two lines of code. The GDI-heavy code to actually paint the strikethrough and the event handling necessary to support this are abstracted away from the plug-in already. This was all a result of work we did years ago to make it super easy to create preview hints for refactorings and code providers. (That’s why CodeRush includes over 185 refactorings – the architecture makes it super-easy to make them.)
Considering the strikethrough code example above eventually led us to this question:
- Can we abstract all aspects of painting out to a layer that plug-ins can exploit to paint on the editor, without requiring explicit knowledge of GDI or WPF?
If you’re familiar with both GDI and WPF, you understand the magnitude of this question. At first glance it seems incredibly challenging. GDI painting is event-driven, and WPF painting is more of a one-time assembly of pieces, and changes to the pieces can result in automatic updates to the images. GDI has none of this. These drawing frameworks are so radically different in so many ways it seems impossible. Of course, on the IDE Tools team, we don’t use the word impossible. We might use “economically infeasible” and “No F*in’ Way”, but never impossible. So the question really became one of economic feasibility. Could we abstract enough of what we needed from these two drawing frameworks in time for the VS 2010 release?
The answer appears to be YES. To be clear, there are two steps here:
- Abstract the painting layer, and create two different engines that map the abstraction to either WPF or GDI.
- Update any existing source code that does anything remotely GDI so it uses the new painting layer.
Drawbacks:
- We have to port GDI-specific code in existing plug-ins to the new framework. Third party developers using GDI to paint as well will also need to be ported if they want to work in VS 2010.
Benefits:
- Single source code base as we move forward.
- Plug-ins using the new painting layer are likely to work in all versions of Visual Studio that support .NET. If you’re a plug-in developer working with CodeRush or DXCore you don’t need to worry about which drawing framework or which version of Visual Studio you will support.
I find this quite exciting because it removes the weight from the decision of whether to work in WPF or to stay in GDI, and that may be a decision developers out there are facing.
Let’s take a look at a real example from the source code for the upcoming CodeRush 10 for VS 2010.
Disclaimer: This is a DevExpress Labs preview. Everything here is subject to change until we release!
The CodeRush stack-based markers feature paints a small triangle on the editor to indicate the position of markers dropped by the developer. Using the new framework, if we want to put something on the editor we start with a descendant of the CRVisualAdornment, like this:
public class CRMarkerAdornment : CRVisualAdornment
{
public CRMarkerAdornment(IElementFrame frame)
: base(frame)
{
}
public override void Render(IDrawingSurface surface)
{
// TODO: Render the marker.
}
public override Size GetSize()
{
return new Size(10, 10);
}
}
The GetSize override allows the adornment to tell the drawing engine how big it is. The Render method override is where we place the code that will actually draw the triangle. That code might look something like this:
public override void Render(IDrawingSurface surface)
{
Point topPoint = new Point(5, 5);
double halfBase = 2.5;
double height = 5;
Point[] points = {
new Point(topPoint.X, topPoint.Y),
new Point(topPoint.X - halfBase, topPoint.Y + height),
new Point(topPoint.X + halfBase, topPoint.Y + height)
};
surface.DrawPolygon(_FillColor, _OutlineColor, points);
}
IDrawingSurface looks a bit like the GDI Graphics object. _FillColor and _OutlineColor are fields of type ColorProperty (more on this in a bit), and their declarations look like this:
ColorProperty _FillColor;
ColorProperty _OutlineColor;
We initialize these fields in our constructor:
public CRMarkerAdornment(IElementFrame frame)
: base(frame)
{
_FillColor = new ColorProperty(Colors.Blue);
_OutlineColor = new ColorProperty(Colors.DarkBlue);
}
ColorProperty is cool. If we use ColorProperties in the Render override, any changes to these values are automatically reflected in the editor, regardless of the platform we are rendering in.
So, for example, if we wanted to create a new transient marker with a short life span of 20 seconds, we could visually indicate that lifespan by changing the values of the ColorProperties over time (for example, changing the transparency of the color).
Let’s give our CRMarkerAdornment new properties so we can do just that:
public Color FillColor
{
get { return _FillColor.Value; }
set { _FillColor.Value = value; }
}
public Color OutlineColor
{
get { return _OutlineColor.Value; }
set { _OutlineColor.Value = value; }
}
Notice these exposed properties are of type Color, not ColorProperty.
And that’s it! Now we have a graphic element that paints in both WPF and GDI. I’m pretty sure this has never been done before. The full source looks like this:
public class CRMarkerAdornment : CRVisualAdornment
{
ColorProperty _FillColor;
ColorProperty _OutlineColor;
public CRMarkerAdornment(IElementFrame frame)
: base(frame)
{
_FillColor = new ColorProperty(Colors.Blue);
_OutlineColor = new ColorProperty(Colors.DarkBlue);
}
public override void Render(IDrawingSurface surface)
{
Point topPoint = new Point(5, 5);
double halfBase = 2.5;
double height = 5;
Point[] points = {
new Point(topPoint.X, topPoint.Y),
new Point(topPoint.X - halfBase, topPoint.Y + height),
new Point(topPoint.X + halfBase, topPoint.Y + height)
};
surface.DrawPolygon(_FillColor, _OutlineColor, points);
}
public override Size GetSize()
{
return new Size(10, 10);
}
public Color FillColor
{
get { return _FillColor.Value; }
set { _FillColor.Value = value; }
}
public Color OutlineColor
{
get { return _OutlineColor.Value; }
set { _OutlineColor.Value = value; }
}
}
By now you might be wondering what namespace holds the types Color, Point, Colors, and Size from the code above. In implementing this framework, we had three choices:
- Use System.Drawing and convert to WPF types when we need to paint with WPF.
- Use System.Windows and convert to GDI types when we need to paint with GDI.
- Use a completely new set of types and convert those to the needed types when painting.
Choice #3 seems to clearly involve the most work. It means the GDI and WPF engines must each implement type conversion, so one might be inclined walk away from that option. However, the first two choices will penalize some customers, forcing both WPF and GDI assemblies to be loaded when only one is really necessary. So we went with choice #3.
So now we have a CRVisualAdornment descendant that paints a triangle on the surface of the editor. There are several ways to add this adornment to the editor. One way is to do something like this:
IElementFrame frame = ea.CreateFrame(new SourceRange(10, 20, 10, 21));
CRMarkerAdornment markerAdornment = new CRMarkerAdornment(frame);
markerAdornment.PenColor = Colors.Red;
markerAdornment.OutlineColor = Colors.DarkRed;
ea.AddAdornment(markerAdornment);
The “ea” in the sample code above represents the event arguments to an unspecified event handler. Adornments can be added in response to a number of IDE events, such as opening a document or scrolling. Adornments can also be added programmatically at any time. The first line in the code above creates a new IElementFrame implementer, which essentially marks a rectangular region in the code using lines and columns. So this marker starts on line 10 at character 20, and runs to character 21 on that same line. Passing the IElementFrame implementer to our CRMarkerAdornment constructor allows the Marker to automatically stick to the code, so when you scroll the marker will scroll too.
Free DevExpress Products - Get Your Copy Today
The following free DevExpress product offers remain available. Should you have any questions about the free offers below, please submit a ticket via the
DevExpress Support Center at your convenience. We'll be happy to follow-up.