TDD stands for Test Driven Development. For the purposes of this post, it refers to the practice of first writing a Test, and then finding the simplest way to make it pass. Typically this involves writing some code.
To demonstrate the use of TDD with CodeRush, we’ll have to do some TDD. In this case I’ll lead you through the start of a code kata.
“A code kata is an exercise in programming which helps a
programmer hone their skills through practice and repetition” – Wikipedia
The particular kata we’re going to use is the Calculator Kata detailed by Roy Osherove. This Kata is a little involved for the purposes of a single blog post so we’ll concentrate on just the first part of it:
- Create a simple String calculator with a method int Add(string numbers)
- Start with the simplest test case of an empty string which should return 0.
So how do we go from “File | New” to “Test Passes” using CodeRush and TDD?
First Steps:
- File | New | (C#|VB) \ Class Library
- Add reference to your Testing framework of choice.
- I’m going to use NUnit and therefore have added a reference to NUnit.Framework.dll
Once your project references a supported testing framework, CodeRush will see this connection and adjust its help to suit. This means you can use the same techniques shown here, whether you’re using XUnit, MbUnit, NUnit or any other supported framework.
Let’s write a test
The full text of a basic NUnit test is:
-------------------------------------------------------------
[TestFixture]
public class Tests
{
[Test]
public void Test()
{
}
}
-------------------------------------------------------------
There are 73 characters in that text including spaces, tabs and newlines. If you add the shift keys necessary to create those parentheses, square brackets, curly brackets and capital letters, then that’s another 14 characters. A total of 87 characters to write some stub code which, names aside, will never really change.
That seems like a lot of typing. I’m sure we can do better than that...
How about t<space>?
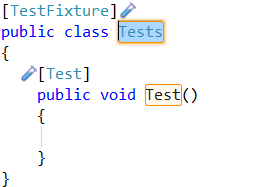
87 keys vs. 2. That’s a 97.7% saving, which is a bargain in anyone’s book.
See how CodeRush provides augmented output from its template. The important parts, the ones you’ll want to adjust, are highlighted. The first of these is also selected, so that you can immediately begin adding the final touches without having to navigate anywhere.
- Enter a name for your Test Class. I’m going with the simple but elegant ‘Calculator_Tests’
Next name the test itself. Use something simple and to the point.
Note: The naming scheme for tests is sometimes quite hotly debated. You should discuss this with your team and arrive at a scheme that suits as many as possible. The one thing everyone seems to agree on, is that the name of your test should reflect its purpose (as with any other method). It should help someone who has seen the test fail, to understand what exactly has failed.
Note: At this point I haven’t even got a Calculator class
According to the spec, the Calculator class has an Add function whose purpose is to parse a list of numbers and return the sum of their values.
According to our spec, the simplest possible case is where the string to be parsed is an empty string. In this case the function is to return a zero (0).
Therefore I will name my test Add_EmptyString_ReturnsZero(). Many will argue that there are better names out there, but IMHO this specifies exactly what our expectations are of this test.
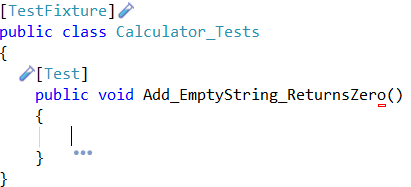
Now let's write the body of the test.
We want to assert that passing String.Empty to our calculator will cause it to return zero.
The NUnit way of expressing this is by calling Assert.Equals, passing in your expectation and result:
Assert.Equals(0, Calculator.Add(""));
In CodeRush the ae<space> template with create the majority of this leaving you to fill out the expectation and actual parameters.
If, as in this case, you know the expectation is going to be zero, you can reduce the effort a little more through the use of the ae0<space> template.
(Excellent, that’s another 16 characters saved.)
The second parameter of this method call is the value we are testing. In this case it’s a call to the Add method described in the spec.
Once we’ve added this we should have:
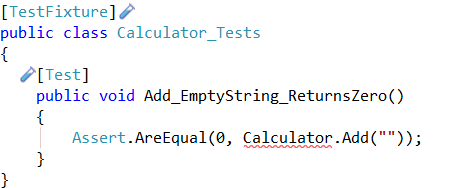
This is all very well, but we don't yet have an 'Add' method. Come to think of it, we still don't have a Calculator class.
Ok let's fix that.
- Place your caret on the reference to Calculator.
- Hit the CodeRush Refactor key (defaults to Ctrl+`) or use the SmartTag.
- Choose 'Declare Class' from the list of possible options.
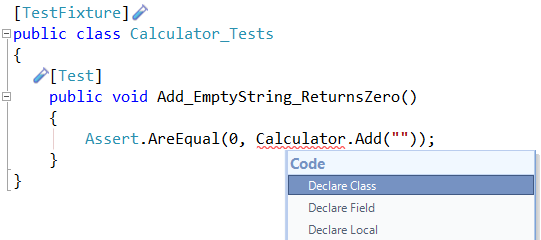
CodeRush builds you a new Calculator class complete with Add Method which takes a String and returns a decimal.

Awesome that's 133 characters created with just a couple of clicks.
Note: If you don't want a default constructor, you can remove it very quickly by placing your caret within it, and choosing the 'Remove Redundant Constructor' from the 'Refactor' SmartTag menu
We can quickly fix up our parameter name and then we can run our test.
Test Runner Shortcuts
Some CodeRush Test Runner Shortcuts (defaults):
Ctrl+T, S (Run tests in the current Solution.) Ctrl+T, P (Run tests in the current Project.) Ctrl+T, C (Run tests in the current Class.) Ctrl+T, F (Run tests in the current File.) Ctrl+T, T (Show the Test Runner Tool Window)
Since for the moment our tests and class are in the same file, Ctrl+T, F will suit us because we will be able to run the tests from anywhere in the file.
So let's run our test and see what happens.
Ctrl+T, F
Well the first thing to note is that our test failed.
This is a good thing. No really, it is. If your test doesn’t fail at first, then either your test is bad, or your code already works for the given scenario. In either case you should not mess with your class under test, until you have a better understanding of the situation.
In should be noted that CodeRush has several ways of telling us that our test failed:
- Inline: We have a red cross to show exactly which test failed and we highlight the failing assertion with a red bar.
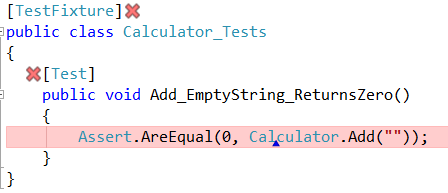
Note: By hovering your mouse over the red cross, you can see a popup which containing details of the failure.

- Our output window shows the results of the test run, the reason for the test failing and a call stack of the run itself.

- Finally we can bring up the CodeRush Test Runner Tool Window (Ctrl+T, T) to show us the complete list of Tests and their current results.
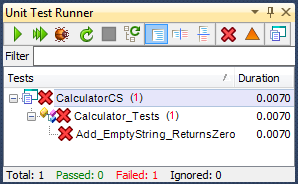
Obviously this view is a little sparse at the moment, because we only have 1 test, but you can see how this would be useful for viewing the state of all of your tests at a glance.
Let's fix our calculator so that the test passes.
Place your caret on the call to Calculator.Add and press F12. CodeRush drops a marker in your current location and moves your caret to the declaration of the Add method.
Have the method return 0; and then hit Esc to return to the calling test.
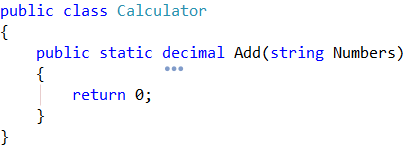
...now run our test again. (Ctrl+T, F)

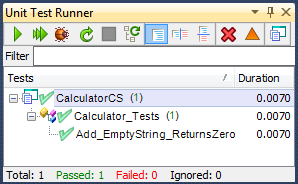
… and we have a Passing Test! Wonderful!
Note that we have done the bare minimum to get the test to pass. The idea here is to use tests to drive out new functionality. So although this implementation is ultimately flawed, it serves the purpose of the existing test.
Naturally we want to improve this implementation, but before we do this TDD dictates that we should construct an additional test which will specify the behaviour we are after. This test should also be implemented in the simplest way possible.
Through repetition of this procedure, we will drive out a new set of requirements and tests to cover those cases and develop a comprehensive and robust test suite which will give us a great deal of confidence in our code.
Well I think that about wraps it up for an initial view of TDD with CodeRush.
I think you'll agree that we have help in spades during the creation of the tests, the creation of the class under test (and its methods) and of course the running of tests.
This has been a very quick tour from “File | New” to “Test Passes”.
In the future I'll give a more in-depth tour of the Unit testing facilities of CodeRush and perhaps we'll even run through a complete Kata from start to finish. :)
So go forth and Test using CodeRush and let’s see what develops.
Free DevExpress Products - Get Your Copy Today
The following free DevExpress product offers remain available. Should you have any questions about the free offers below, please submit a ticket via the
DevExpress Support Center at your convenience. We'll be happy to follow-up.